Building a $15,000 Wood Slab Kitchen Island
No matter your woodworking experience, from beginner to veteran, there will come a time when you tackle a project that is massive in scope and price. The bread and butter sales of many woodworkers include charcuterie boards, coffee tables, or end tables.
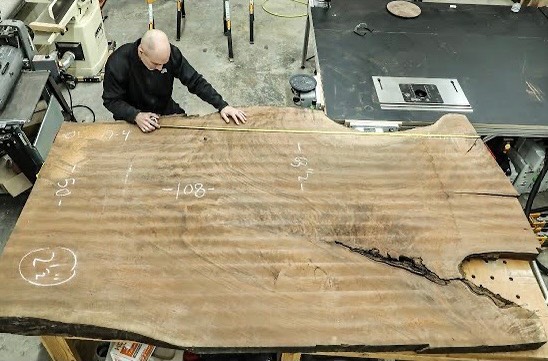
These projects are a fundamental part of the woodworker’s arsenal, but there is something special about taking on a project with the largest slab you can find. This article will explore some of the considerations you will need to make when constructing something as massive as a $15,000 kitchen island.

Transportation is Vital
Most projects of this size and scope will involve working with a client’s commission specifications. As such, the chances are that when they approach you with a custom job like this, they will probably have a slab or even a particular tree in mind if it is coming down from their property.
Most seasoned woodworkers will have a trailer or specific vehicle for transporting these sometimes enormous pieces of wood, and for good reason. A pickup truck is usually fine for working with smaller pieces or salvaged lumber you have collected for your own projects, but it’s not worth risking with a client’s specified materials.
You may be tempted to save a few dollars and try to rig these huge slabs into your truck any way they’ll fit, but it is generally worthwhile to borrow or rent a trailer. Better to spend a little extra to ensure that nothing goes wrong in transportation before you even get the slab to your shop.
Keep in mind that factoring in transportation is not done once you have the project in your shop. Eventually, you will complete the construction, and you’ll need to deliver the finished piece to your client. Some woodworkers with countrywide or worldwide customers build custom crates and then ship their finished pieces as freight. In contrast, others only work locally, so delivery and installation are much more localized and can be handled personally.
There is no single right way to handle this part of the process, but keep your transportation costs in mind as you provide your quote to your client. While materials are usually the main contributor to a project this large, you can’t overlook these essential details.

Filling the Void with Epoxy
Over the last several years, in particular, epoxy has been growing in popularity, and it is an incredible tool for woodworkers specializing in live-edge pieces. There is a lot of nuance to working with this material, and if you’re new to it, it is worth looking up some tutorials to ensure you get the most out of your purchase.
To help you in your job, the following is a list of some important tips and reminders, especially for newer woodworkers. Although it is not exhaustive, it will give you a great starting point to continue refining your techniques!
- Make sure you remove all of the bark, especially from softwoods, as these will compromise the bond between the wood and the epoxy, which will damage the piece’s structural integrity.
- Take the time to create a leak-proof epoxy mold, and include a mold release agent before you begin your pour. If you don’t, you may find yourself needing to chisel the mold away from your project.
- Learn the differences between different brands and different types of epoxy. While some situations will call for deep-pour epoxy, especially with very thick slabs, you may need to consider other options. In the case of our example of a kitchen island, consider using a tabletop epoxy, as it will be more heat-resistant and physically harder, even just for the top part of the pour.
- If you find yourself adding more epoxy to an existing pour (if you didn’t use quite enough initially), ensure that you mix them up exceptionally well within the void. Even if you use the same color and measurements, you may find imperfections if you don’t take this precaution.
- Pop all the bubbles. Whether you use a heat gun or a propane torch, or any other tool, make sure that you are prepared to remove every single bubble before the epoxy hardens.
- Note that some types of epoxy (notably tabletop epoxy) are much more prone to bubbles. Suppose you find bubbles after the epoxy has hardened, which you may, especially around the edge of the wood. In that case, you can carefully chisel them out and then use a new epoxy fill or CA glue to fill them in correctly. If you do this, don’t try to use the same color as your existing pour, as it will be impossible to get the same mix in this tiny volume, so use clear instead as it will harden completely invisible.

Work with your Client Closely
Every woodworker is different, and every client has different needs as well. You will save yourself enormous frustration, especially with massive projects like our example above, by communicating consistently and effectively with your client.
This certainly involves discussing the realistic timeframe involved and the costs of hiring a woodworker to create a custom piece. However, you should also check in with them periodically throughout the construction process to go over their expectations and ensure that their vision is realistic with the materials and customization options they want.
In the case of a kitchen countertop, for example, in the long term, wood is not technically a good choice for the longevity of that kind of workspace. If a customer puts a hot pan down on the countertop and ruins it, they will inevitably call you and ask for a refund or similar. This is why building trust with your clients is so important. We don’t always choose wood because it is the most durable or the cheapest material; we use it because it speaks to us and resonates with us.
Ensure that you communicate the realistic results that will come with their custom build because that may be the difference between a satisfied customer and one who gives you grief a few years down the line. Keep these details in mind, and your first $15,000 project will only be the start of a long and fruitful career!